
Where to Place Water Leak Sensors in Your Home
Discover the best places to put water leak sensors—from water heaters and washing machines to sinks and basements—to stop leaks before they cause major damage.
Editorial Research Standard
Our conclusions are based on relevant manufacturer specifications, product documentation, warranties, and professional guidance. The evidence used varies by guide and is disclosed below.
Learn more in our Editorial Policy.
A smart water leak detector can help prevent costly property damage, but only if water actually reaches its sensing contacts or cable. A top-rated sensor sitting just outside the likely water path or propped up on an inaccessible shelf is virtually useless during a sudden plumbing failure.
Placement matters just as much as choosing the device. According to guidance from the U.S. Environmental Protection Agency (EPA) WaterSense program and building safety organizations, the goal of strategic water leak sensor placement is early warning: positioning sensors where water from the most likely failure point will collect or pass first, long before moisture penetrates subfloors, drywalls, or finished ceilings.
This practical guide covers where to place point-style water leak sensors throughout your home, how to prioritize placement if you only own a few devices, key differences between pucks and extension cables, and locations where sensors should never be placed.
Quick Answer: The Best Places to Put Leak Sensors
For maximum protection against unexpected plumbing failures, place water leak sensors near equipment containing pressurized supply lines, storage tanks, flexible hoses, or active drain connections.
Best Locations for Water Leak Sensors:
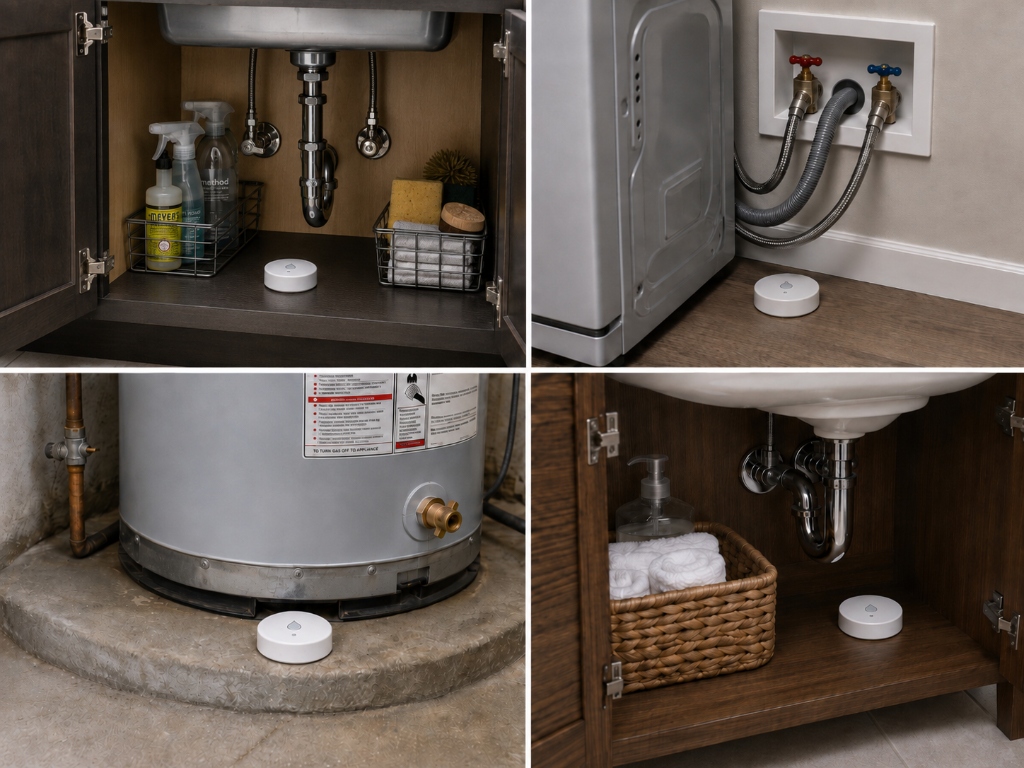
- Water Heater: On the floor immediately beside the tank or inside the drain pan.
- Washing Machine: On the floor directly behind the unit, beneath the supply hose valves and drain connection.
- Dishwasher: Beneath or behind the toe-kick panel using a thin remote probe or sensing cable.
- Refrigerator & Ice Maker: On the floor behind the unit near the water line shutoff valve.
- Under Sinks: On the cabinet floor directly beneath shutoff valves, P-traps, and garbage disposals.
- Toilets: On the floor behind the bowl, near the angle stop valve and flexible supply line.
- Sump Pump & Basement: On the basement floor where overflowing water from the sump basin is most likely to travel, or near floor drains.
- HVAC Condensate Line: Near or inside secondary condensate drain pans beneath indoor air handlers (as permitted by manufacturer instructions).
- Water Softeners & Filtration Systems: On the floor beside salt tanks, resin tanks, and Reverse Osmosis (RO) waste lines.
Only Have 3 Sensors? Put Them Here First
If you purchased a standard multi-pack or are starting with a modest budget, you do not need to cover every fixture immediately. Focus your first three sensors on locations with high water volume, pressurized lines, and significant potential for unobserved damage.
1. Water Heater (Primary Priority)
Tank-style water heaters store 40 to 80 gallons of water under continuous household pressure. Leaks or discharges can originate from tank corrosion, supply line connections, a leaking drain valve, or the Temperature and Pressure (T&P) relief valve discharge pipe. Because a tank or connection failure can continue releasing water until the supply is shut off, placing your first sensor here addresses a high-priority location for leak detection.
2. Washing Machine (Secondary Priority)
Insurance industry loss-prevention guidelines from organizations like the Institute for Business & Home Safety (IBHS) highlight washing machine supply hoses as a primary source of residential water damage. Rubber supply hoses remain under constant water pressure and often operate while unattended. A burst or disconnected hose can discharge a significant volume of water onto laundry room floors until the supply valve is closed.
3. Home-Specific Highest Risk (Tertiary Priority)
Rather than defaulting automatically to a kitchen sink, select your third location based on your home’s unique architectural vulnerabilities:
- Finished Basement / Sump Area: If your basement is finished or relies on a sump pump to stay dry, place your third sensor in the path where water would flow if the pump fails or a drain backs up.
- Second-Floor Laundry or Bathroom: Water leaking from upper levels can cause extensive damage as it migrates through ceiling drywall, floor joists, and electrical fixtures below.
- Refrigerator Ice Maker Line: If you have a flexible plastic ice maker line hidden behind built-in kitchen cabinetry, a silent pinhole leak can rot flooring for weeks before becoming visible.
How to Choose the Right Location: Follow the Water Path
Do not rely on arbitrary rules such as placing every sensor exactly two inches from an appliance. Plumbing layouts, floor pitch, and cabinet construction vary significantly between homes.
Instead, follow the likely water path: put the sensor where water from the most likely failure point will collect or pass first.
Core Placement Principles:
- Identify Pressure Points: Pressurized supply lines (angle stops, braided flex lines, ice maker tubing) leak with greater volume than unpressurized gravity drains (P-traps, sink drains). Position sensors closer to pressurized shutoff valves.
- Observe Floor Pitch & Gravity: Fluid follows the path of least resistance. In basements or utility rooms, check for subtle floor slants or depressions. Place the sensor in the natural drainage path near the appliance.
- Account for Cabinet Lips: Under-sink cabinets often have raised front lips or interior dividers. Water will pool in the center or back corner of the cabinet floor before spilling onto room flooring. Place sensors inside the cabinet, not outside on the kitchen floor.
- Avoid Obstructions: Ensure cleaning supplies, buckets, or stored items inside cabinets do not elevate the sensor off the cabinet floor.
Room-by-Room Sensor Placement Guide
Water Heater
Water heaters are a top-tier placement priority because tank or connection failures can release continuous water flow.
- Where to Place: Place a point puck sensor directly inside the drain pan if one is installed under the unit (as recommended by International Plumbing Code standards for locations where leakage causes structural damage). If there is no pan, position the sensor on the floor immediately adjacent to the base of the tank, directly below likely leak paths such as the cold water inlet, hot water outlet, drain valve, or T&P relief valve discharge pipe.
- Drain Pan Placement: Follow manufacturer instructions when placing sensors or sensing cables inside metal drain pans, as contact designs and insulation requirements vary by model.
Washing Machine
Washing machines combine high-pressure supply hoses with heavy vibration and active drain discharge.
- Where to Place: Place the sensor flat on the floor directly beneath or behind the appliance, aligned under the hot and cold water shutoff valves and wall drain pipe connection.
- Vibration Caution: Position the sensor far enough from machine legs so that normal spin-cycle movement does not crush the device or push it away from the wall.
Dishwasher
Dishwashers frequently leak from door gaskets, internal pump seals, or water inlet valves located underneath the tub.
- Where to Place: Because standard puck sensors are often too tall to fit underneath low-clearance toe-kick (kickplate) panels, do not force a thick sensor underneath. Use a remote thin probe disc or a flexible sensing cable routed beneath the front toe-kick, or place a sensor inside the adjacent kitchen sink cabinet near the dishwasher supply branch.
Refrigerator & Ice Maker Line
Small pinhole leaks in plastic or copper ice maker tubing can drip silently behind refrigerators, damaging subfloors and hardwoods.
- Where to Place: Position the sensor on the floor behind the refrigerator, close to the wall shutoff valve or where the flexible water tube exits the wall/floor. If clearance is tight, slide a flat sensing cable or remote probe underneath the rear edge.
Under Sinks (Kitchen, Bathroom & Utility)
Sink cabinets house multiple potential failure points: supply shutoff valves (angle stops), supply lines, faucet gaskets, P-traps, and garbage disposals.
- Where to Place: Set the sensor flat on the cabinet floor near the back wall, directly beneath the shutoff valves and main P-trap drip line. In kitchen cabinets with garbage disposals, place it where drips from the disposal housing will hit the cabinet floor.
Toilets
Toilet leaks usually involve failing fill valves, loose supply lines, overflow conditions, or wax ring deterioration.
- Where to Place: Position the sensor on the bathroom floor directly behind the toilet bowl, near the wall angle stop valve and flexible fill line.
- Understanding Limits: A point leak sensor on the floor will detect water from a leaking supply line, sweating tank, or bowl overflow. However, it will not detect internal flapper leaks running down the inside of the drainpipe, nor will it catch minor wax ring failures until water migrates out onto the finished floor surface.
Sump Pump & Basement Floor
Basements face dual threats: plumbing pipe leaks and groundwater intrusion during heavy rains.
- Where to Place: Position a standard floor leak sensor on the basement floor in the path where water would naturally flow if the sump basin overflows or a main floor drain backs up.
- Important Distinction: Standard floor leak sensors should not be submerged inside a sump pit. Monitoring water levels inside the pit requires a manufacturer-approved float switch, probe, or specialized device rated specifically for sump-basin installation. If your home relies on a sump pump, proper pump capacity matters too. See how to size a sump pump using GPM and Total Dynamic Head.
HVAC Condensate Systems
Air conditioning coils and high-efficiency furnaces produce gallons of condensate water daily. Clogged condensate drain lines can overflow drain pans into attics, closets, or ceilings.
- Where to Place: If permitted by the sensor manufacturer, place a sensor inside or immediately next to the secondary condensate drain pan located underneath indoor air handlers (especially units located in attics or upper-floor closets).
Water Softeners & Whole-Home Filtration
Water softeners, iron filters, and Reverse Osmosis (RO) systems feature continuous water pressure, automatic bypass valves, and brine tanks.
- Where to Place: Position sensors on the floor near the brine tank base, control valve head, and RO wastewater drain connection points.
Special Rule for Two-Story Homes: Prioritize Overhead Vulnerabilities
When mapping out leak detection for multi-story homes, apply the Overhead Damage Principle:
Prioritize water sources located directly above finished living spaces.
A small leak in a basement utility room might pool harmlessly on unfinished concrete. That same leak originating from a second-floor laundry room, master bathroom vanity, toilet supply line, or attic HVAC handler can ruin insulation, warp hardwood flooring, damage drywall ceilings, and migrate into electrical fixtures below.
If your laundry room or main HVAC unit is on an upper floor, consider bumping those locations to high-priority status.
Puck vs. Remote Probe vs. Sensing Cable
Selecting the right physical sensor format ensures reliable contact with leaking water without damaging equipment.
| Sensor Style | Best Used For | Key Advantage | Limitation |
|---|---|---|---|
| Spot Puck Sensor | Open floors, under sink cabinets, next to water heaters, basement slabs. | Self-contained, easy battery replacement, loud built-in sirens. | Requires water to physically reach the sensor’s metal contacts; cannot fit under low-clearance kickplates. |
| Remote Probe / Disc | Dishwashers, low-clearance refrigerators, tight vanity gaps. | Ultra-thin profile slides under low appliance bases while main sensor sits accessibly on wall/cabinet. | Requires cable routing between probe and main sensor unit. |
| Perimeter Sensing Cable | Water heater circumferences, coiling under dishwasher toe-kicks, washing machine nooks. | Detects moisture along its entire length; provides wide-area coverage. | Slightly higher initial cost; cable must be kept clean to avoid false triggers. |
How Many Leak Sensors Do You Need?
There is no single “correct” number of leak sensors for every household. Rather than attempting to buy a fixed universal quantity, count your home’s major water-risk zones and prioritize by likelihood of failure, potential water volume, and cost of finished property damage.
Example 6–8 Sensor Layout
One possible configuration for a typical 3-bedroom, 2-bathroom single-family home includes 6 to 8 sensors placed across major risk points:
- Water heater (1 puck or perimeter cable)
- Washing machine (1 puck or rear cable)
- Kitchen sink cabinet & dishwasher (1 puck or combination dual-probe sensor)
- Refrigerator ice maker line (1 puck or remote probe)
- Primary / Upstairs bathroom vanity & toilet (1–2 pucks)
- Basement sump overflow path / floor drain or HVAC condensate pan (1–2 pucks/probes)
Adjust the layout based on your home’s floorplan, number of plumbing fixtures, and whether you use remote probes or sensing cables to cover multiple adjacent areas.
Where NOT to Place Water Leak Sensors
Improper placement leads to nuisance alarms, damaged sensors, or missed leaks. Avoid these common placement mistakes:
- Directly Under Uninsulated Cold Water Pipes: Pipes that “sweat” heavily from atmospheric condensation during humid summer months can drop condensation directly onto sensor contacts, causing false alarms. If heavy atmospheric condensation occurs throughout your basement or utility room, consult our dehumidifier sizing guide to calculate equipment requirements for humidity control.
- Under Appliance Footings or Anti-Vibration Pads: Placing a sensor directly under the heavy leveling legs of a washing machine or dishwasher will crush the device housing or break internal circuits.
- High-Splash Zones: Avoid placing sensors on open bathroom floor areas directly adjacent to shower curtain edges, bathtub rims, or pet water bowls where normal everyday splashing will trigger alarms.
- Submerging Sensors (Unless Rated for Submersion): Do not submerge a sensor or probe in water unless the manufacturer explicitly rates the device or remote sensor for submerged use.
- Directly Against Bare Metallic Surfaces: Follow manufacturer instructions when placing sensors in metallic pans or against metal piping, as exposed contacts on certain models may short-circuit and trigger false alarms.
Point Sensors vs. Whole-Home Water Monitors & Automatic Shutoffs
Standalone point sensors are one component of a complete home water security strategy. Understanding how they interact with whole-home systems helps you build a layered defense.
- Point / Spot Leak Sensors: Detect liquid water locally at specific high-risk fixtures. They provide rapid, room-specific notifications but cannot detect hidden pipe bursts inside walls or ceiling joists.
- Whole-Home Smart Water Monitors: Pipe-mounted inline monitors (installed on the main supply line) track continuous water flow, pressure changes, and micro-leaks across the entire home plumbing network.
- Automatic Main Shutoff Valves: Motorized main line valves that physically shut off the main water supply when triggered.
How They Work Together
Modern smart home systems allow point sensors to pair directly with automatic main shutoff valves. For example, if a spot sensor behind a second-floor washing machine detects water, it can send a wireless signal to a motorized shutoff valve on your main supply line—promptly shutting off the water supply to reduce potential damage, even if you are away from home.
To compare standalone spot sensors, hub-connected kits, and automatic shutoff systems, read our comprehensive buyer’s guide to the best smart water leak detectors.
Home Leak-Sensor Audit Checklist
Before placing your leak sensors, complete this quick walkthrough of your home as part of your routine seasonal home maintenance checklist:
- Check Water Heater Age & Pan: Locate the water heater. Note if a drain pan exists and clear any debris near the tank base.
- Inspect Washer Hoses: Feel behind the washing machine to locate shutoff valves. Check for floor space that won’t crush a sensor during high-speed spin cycles.
- Test Dishwasher Kickplate Clearance: Check if a thin remote probe or sensing cable is needed to slip beneath the dishwasher toe-kick.
- Locate Under-Sink Low Points: Open kitchen and bath vanity cabinets. Identify the lowest point on the cabinet floor directly under shutoff valves.
- Verify Refrigerator Shutoffs: Locate the ice maker line behind the fridge or inside the adjacent cabinet.
- Inspect Upstairs Fixtures: Identify any water fixtures sitting directly above finished living areas, bedrooms, or drywall ceilings.
- Test Wireless Range: Ensure your intended placement spots have adequate Wi-Fi or smart hub signal coverage before final installation.
- Review Recommended Hardware: Need to select or expand your sensor setup? Compare battery life, wireless protocols, and shutoff options in our review of the best smart water leak detectors.
Sources & References
- EPA WaterSense: Fix a Leak Week & Home Leak Detection Guidance (U.S. Environmental Protection Agency)
- IBHS (Insurance Institute for Business & Home Safety): Residential Property Damage Loss Prevention Studies
- International Code Council (ICC): International Plumbing Code (IPC) Water Heater Pan & Drainage Regulations
- Moen: Moen Flo Smart Water Detector Documentation & Technical Manuals
- Phyn: Phyn Smart Water Sensor Installation Specs & Cable Extensions
- Resideo / Honeywell Home: Resideo Wi-Fi Water Leak & Freeze Detector Installation Guides
DwellNinja Editorial Team
Objective Homeowner Advice
The DwellNinja Editorial Team researches manufacturer documentation, product specifications, warranties, and professional guidance to produce practical homeowner guides.
DwellNinja Newsletter
Practical homeowner tips, product comparisons, and useful updates are on the way.
Related Guides You Might Like
Best Smart Water Leak Detectors for Homeowners (2026 Comparison)
Compare battery life, alerts, hub requirements, and shutoff options for the best smart water leak detectors, spot sensors, and water monitors.
Best Water Leak Detection Systems for Rental Properties & Landlords (2026)
Compare water leak detection architectures for rental properties—from DIY hub systems and STR monitors to cellular platforms and main-line shutoff valves.